
Before You Begin
Make sure the following is in place before you start:
- A user account with permission to view vehicles. To add, edit, or delete assignments you also need the Manage Assignments permission for vehicles. If the Add Assignment button isn't visible, ask your account administrator to grant it (see Managing Permissions for Vehicle and Equipment Assignments).
- The vehicles you want to schedule are already added to your account and aren't archived.
- The drivers you want to assign are already added as Contacts.
Heads up: Assignments replace the older single-driver "Current Assignee" field. The current driver shown on a vehicle's record is now automatically updated based on the active scheduled assignment. You can no longer edit that field directly — instead, you add or update assignments on the timeline.
Related articles:
Step-by-Step Instructions
Step 1: Open the Vehicle Assignments calendar
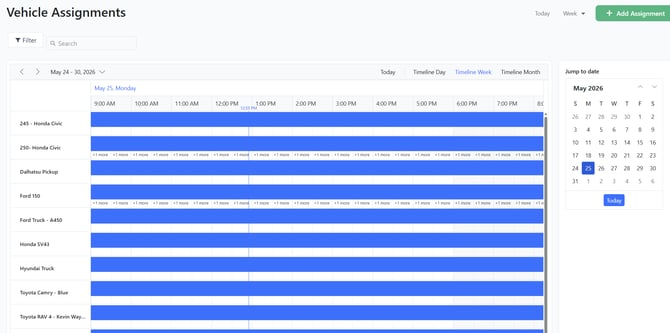
The calendar gives you a single timeline view of every vehicle in your account.
- In your browser, go to your Expiration Reminder account.
- Navigate to the Vehicle Assignments page (path:
/vehicle/assignments).
You'll see the Vehicle Assignments page with each vehicle listed as a row in the left column and time across the top. Existing assignments appear as colored bars on the timeline.
Step 2: Choose the time range you want to see
The calendar opens by default in Week view. To switch:
- In the upper-right toolbar, click the view selector (it shows the current view's name — for example, Week).
- Choose Day, Week, or Month.
- To jump back to the current day, click Today.
- To jump to a different date, use the Jump to date mini calendar on the right side of the page.
Tip: Use Day view for a detailed look at shift handoffs, Week for planning a typical work week, and Month for longer-range scheduling.
Step 3: Filter and search the timeline
Use the toolbar above the calendar to focus on the vehicles or drivers you care about:
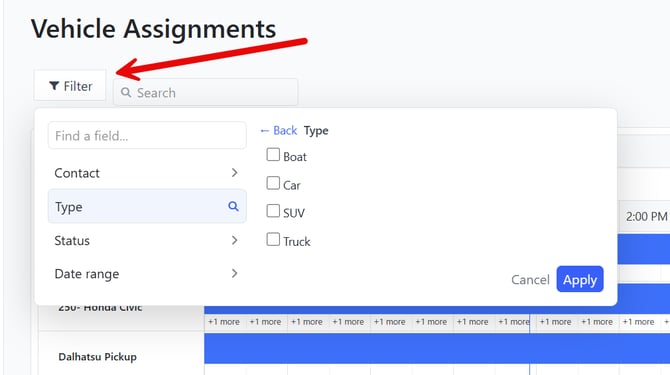
- Click Filter to open the filter panel and narrow the view by:
- Contact — show assignments for one or more drivers.
- Type — show only certain vehicle types.
- Status — show Started (currently in effect), Stopped (ended), or Scheduled (future) assignments.
- Date range — override the visible window with a custom date range.
- Use the Search box to filter the left column down to a specific vehicle by name.
Step 4: Add an assignment
There are two ways to start a new assignment:
- From an empty timeline cell: Click an empty area on the row of the vehicle you want to assign, at roughly the time the assignment should start. The Add Assignment dialog opens with that vehicle pre-filled.
- From the toolbar: Click the + Add Assignment button in the upper-right corner. The dialog opens with no vehicle pre-selected.
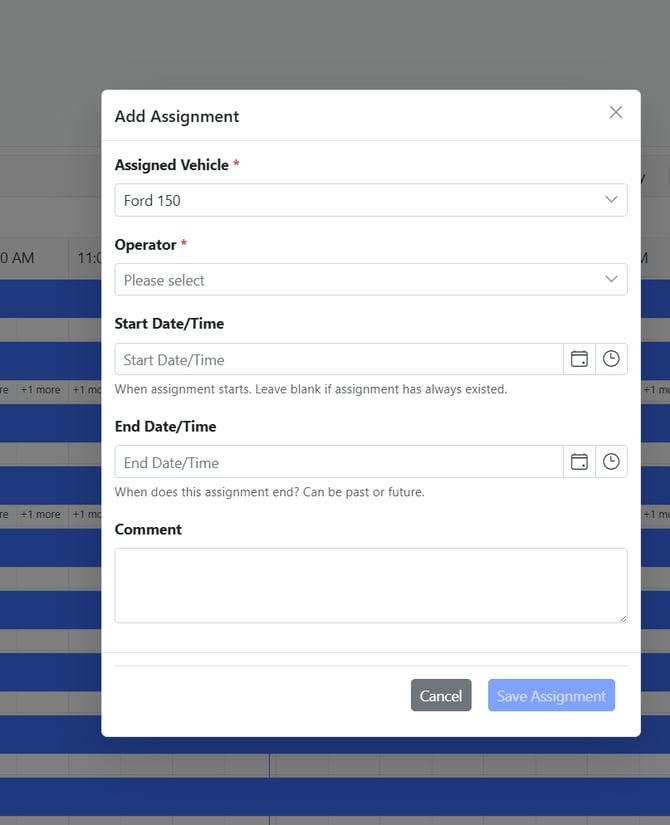
In the Add Assignment dialog:
- Assigned Vehicle — Required. Pick the vehicle (already filled in if you opened the dialog from a cell).
- Operator — Required. Pick the driver who will operate the vehicle. Use the type-ahead search to narrow long contact lists.
- Start Date — Optional. Pick the date and time the assignment begins. Leave blank if the assignment has always existed (for example, you're back-filling history for a vehicle that's been with this driver for years).
- End Date — Optional. Pick the date and time the assignment ends. Leave blank for an ongoing assignment with no planned end.
- Comment — Optional. Add up to 2,000 characters of context — for example, "Morning shift" or "Loaner vehicle while #14 is in service."
- Click Save Assignment.
A confirmation toast appears at the top of the page, the dialog closes, and the new assignment bar shows up on the timeline immediately.
Step 5: Schedule two operators on the same vehicle (multi-operator scheduling)
If your fleet runs multiple shifts on the same vehicle — for example, a morning driver and an afternoon driver on the same truck — you can schedule both at the same time:
- With the calendar open, click the cell at the start of the first shift on the vehicle's row.
- Fill in the Add Assignment dialog:
- Operator: morning driver (for example, Alex).
- Start Date: tomorrow at 6:00 AM.
- End Date: tomorrow at 2:00 PM.
- Comment: "Morning shift."
- Click Save Assignment.
- Click the cell at the start of the second shift on the same vehicle's row (or click + Add Assignment in the toolbar).
- Fill in the dialog again with the second operator and times:
- Operator: afternoon driver (for example, Jamie).
- Start Date: tomorrow at 2:00 PM.
- End Date: tomorrow at 10:00 PM.
- Comment: "Afternoon shift."
- Click Save Assignment.
Both assignments appear on the same row of the timeline. Different drivers can have overlapping windows on the same vehicle — but the same driver can't be scheduled twice on the same vehicle during overlapping times.
Step 6: Edit an existing assignment
- Click any assignment bar on the timeline.
- The Edit Assignment dialog opens with the existing details filled in.
- Change any field — operator, start, end, or comment — and click Save Assignment.
The bar updates on the timeline immediately. If you change the dates so the assignment now (or no longer) covers "right now," the vehicle's Current Assignee is updated automatically within a few minutes.
Step 7: Use the per-vehicle Assignments tab
If you only need to see assignments for one vehicle, the per-record tab is often faster:
- Open the vehicle's detail page (from the Vehicles list, click a vehicle's name).
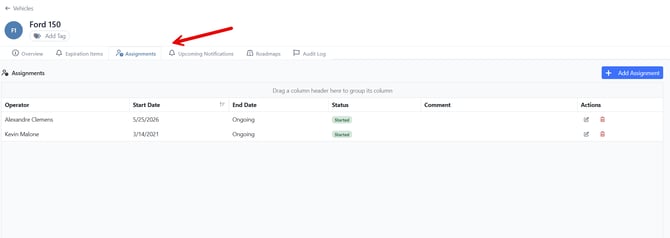
- Click the Assignments tab. You'll see a list of every assignment for that vehicle, grouped by Status (Started, Stopped, Scheduled) and sorted by Start Date (most recent first).
- To add an assignment for that specific vehicle, click + Add Assignment at the top of the tab — the vehicle is pre-filled.
- To edit, click the pencil icon on a row. To delete, click the trash icon and confirm.
The Current Assignee field on the vehicle's overview is now read-only — it reflects whichever scheduled assignment is currently active. Click View / manage assignments next to the assignee name to jump to the Assignments tab.
Understanding "Always" and "Ongoing"
When you leave Start Date or End Date blank, the assignment list shows special labels in place of dates:
- Always in the Start Date column means the assignment has no defined beginning — it's been in effect "forever." Use this for long-running assignments where the original start date isn't important to track.
- Ongoing in the End Date column means the assignment has no planned end date. Use this for current assignments that don't have a scheduled handoff yet.
On the calendar, assignments with no start show a ‹ chevron at the left edge of the bar; assignments with no end show a › chevron at the right edge.
Tips & Best Practices
- Plan ahead with future-dated assignments. You can schedule assignments days, weeks, or months in advance. The system flips the vehicle's current driver automatically when the start time arrives.
- Use comments for context. A short note like "Loaner — #14 in service" or "Pilot for new driver onboarding" helps the rest of your team understand why the assignment exists.
- Bookmark the calendar. If you schedule assignments daily, add
/vehicle/assignmentsto your browser bookmarks for one-click access. - Filter by Status before reviewing. When auditing, set the Status filter to Started to see exactly who's driving what right now.
- Use the Operator filter for follow-up. If a driver leaves the company, filter the calendar by that contact to see every active or future assignment that needs to be reassigned.
Troubleshooting
- Issue: The + Add Assignment button doesn't appear.
Solution: You don't have permission to manage vehicle assignments. Ask your account administrator to grant the Manage Assignments permission for vehicles. See Managing Permissions for Vehicle and Equipment Assignments. - Issue: I get an error: "This contact already has an overlapping assignment for this vehicle/equipment."
Solution: The same driver is already scheduled on this vehicle for an overlapping time window. Either pick a different driver, adjust the times so they don't overlap, or open the existing assignment and edit it instead of creating a new one. - Issue: I get an error: "End date must be after start date."
Solution: Make sure the End Date is later than the Start Date. If you want an open-ended assignment, leave End Date blank. - Issue: I changed an assignment but the Current Assignee on the vehicle's record didn't update.
Solution: The current assignee refreshes automatically a few minutes after a change, or as soon as the start/end time of an assignment is reached. If it's still stale after several minutes, refresh the page. - Issue: A vehicle I expected to see is missing from the calendar's left column.
Solution: Archived and deleted vehicles aren't shown. Also check the Search box and the Type filter — clear them to see all vehicles. - Issue: I want to remove an assignment entirely.
Solution: On the vehicle's Assignments tab, click the trash icon on the row, then confirm. The assignment is removed and, if it was the active one, the vehicle's current driver is recalculated.