
Before You Begin
- The Vehicles module must be enabled on your plan. If you don't see Vehicles in the left sidebar, contact your account admin.
- You need permission to view and create vehicles. Roles without these permissions hide the Add Vehicle button.
- Related articles:
What you can do on the Vehicles page
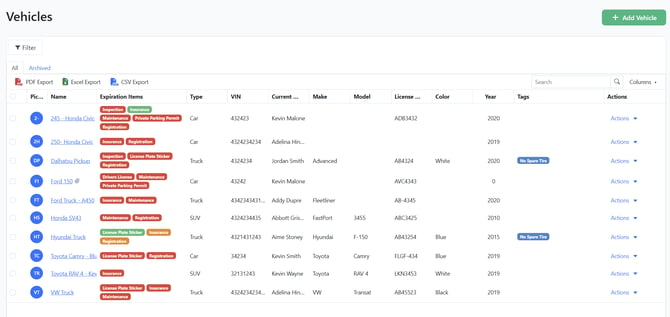
The Vehicles list shows every vehicle in your account with built-in columns for:
- Picture — an avatar or photo of the vehicle.
- Name — the vehicle's nickname or identifier.
- Expiration Items — quick-look chips showing each related expiration's status.
- Type — vehicle type (Sedan, Truck, etc.) from your Vehicle Types list.
- VIN — Vehicle Identification Number.
- Current Assignee — the contact this vehicle is currently assigned to.
- Make, Model, License Plate, Color, Year — standard registration fields.
- Locations — locations this vehicle is linked to.
- Owner — the user who owns this vehicle record.
- Tags — any tags applied.
Step-by-Step Instructions
Step 1: Open the Vehicles list
From the left sidebar, click Vehicles.
Step 2: Filter and search
- Use the Filter panel above the grid to narrow by location, type, owner, or any custom field.
- Use the grid's Search box to find a vehicle by name.
- Click a column header to sort.
Step 3: Add a new vehicle
- Click the green Add Vehicle button in the upper right.
- A sidebar opens on the right.
- Fill in the basic fields: Name, Make, Model, Year, VIN, License Plate, Color, Type.
- Optionally assign a Location and an Owner.
- Save.
The vehicle appears in the list immediately.
Step 4: Open a vehicle to edit it
Click the vehicle's name in the list to open its detail page. From there you can:
- Edit any field inline by clicking the value and typing a new one.
- Switch to the Expirations tab to add or renew expiration items (for example, Registration, Annual Inspection, Insurance).
- Switch to the Documents tab to attach photos, registration scans, or maintenance records.
- Switch to the Assignments tab to assign the vehicle to a driver, set assignment start/end dates, and review history.
Step 5: Assign or reassign a driver
- Open the vehicle.
- Switch to the Assignments tab.
- Click Add Assignment.
- Pick the contact (driver), the start date, and (optionally) the end date.
- Save.
The vehicle's Current Assignee column updates immediately.
Step 6: Track expirations on the vehicle
Vehicles can have unlimited expiration items attached to them. The most common are:
- Vehicle Registration — renewed annually.
- Annual Inspection — required in most jurisdictions.
- Insurance — pulls in from your policy renewal date.
- Emissions Test — where required by your state or province.
Add each expiration on the Expirations tab and the vehicle will appear in your Calendar and Reports with the right renewal cycle.
Step 7 (optional): Export the list
Use the grid toolbar's Export options to download the full list to Excel, PDF, or CSV.
Tips & Best Practices
- Use a consistent naming convention. "Truck 27" or "F-150 Plate ABC-1234" is much easier to find later than "Vehicle 5".
- Pair vehicles with locations. Linking each vehicle to its home location makes the Location List Report and the Calendar filter much more useful.
- Use Tags for fleets. Apply tags like "Sales Fleet" or "Maintenance Vehicles" to group vehicles for filtering and bulk operations.
- Set the Owner field. The Owner is the user who's accountable for keeping the record current — useful for reports and accountability reviews.
Troubleshooting
- Issue: The Vehicles menu is missing from the sidebar.
Solution: The Vehicles module is disabled on your plan. Contact your account admin to enable it. - Issue: I can't add a vehicle — there's no Add Vehicle button.
Solution: Your role doesn't include the Vehicle Create permission. Ask an admin to update your role. - Issue: A vehicle shows the wrong Current Assignee.
Solution: Open the vehicle and switch to the Assignments tab. The Current Assignee is whichever assignment is active for today's date. - Issue: Vehicle expirations aren't appearing on the Calendar.
Solution: The Calendar filter may have removed the relevant document types. Check the Filter by Type chips and add the vehicle-related document types back.