
Before You Begin
- Anyone with access to Companies can view the list. Admins can add, edit, and delete companies.
- A Company represents a business as a whole. Individual Contacts at that company can be linked to it separately. Use Locations if you want to organize many contacts under one physical place rather than a corporate entity.
- Related articles:
What you can do with Companies
The Companies module lets you:
- Keep a single record for every business you do business with.
- Attach contacts (employees of that company) to it.
- Track expiration items linked to the company (insurance certificates, vendor agreements, W-9 forms, etc.).
- Send bulk notifications to every contact at that company.
- Run the Company List Report for an overview.
When to use Companies vs. Locations: Use Companies for businesses you have a relationship with (vendors, customers). Use Locations when you need to group contacts physically (your office, a warehouse, a job site).
Step-by-Step Instructions
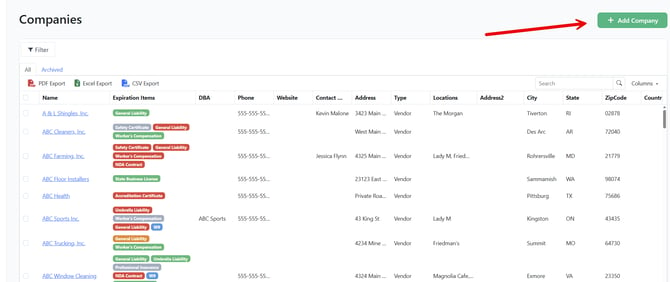
Step 1: Open the Companies list
From the left sidebar, click Companies.
You'll see every company in your account, with columns for:
- Name
- Expiration Items — quick chips showing the status of any expiration items linked to the company
- DBA (doing business as)
- Phone
- Website
- Contact Name (the primary contact)
- Address / Type / Locations
- Owner
Step 2: Search and filter
- Use the Search box in the toolbar to find a company by name.
- Use the filter panel above the grid to narrow by type, owner, location, or tags.
- Click any column header to sort.
Step 3: Add a new company
- Click the green New Company button in the upper right.
- A form opens.
- Fill in the company's Name, Company Type, Phone, Website, Address, and any other available fields.
- Optionally pick a Primary Contact from your existing contacts.
- Save.
The company appears in the list immediately.
Step 4: Open a company to edit it
Click the company's name to open its detail page. From there:
- Edit any field inline by clicking the value and typing a new one.
- Switch to the Contacts tab to add or remove contacts associated with this company.
- Switch to the Expirations tab to add expiration items tied to the company (insurance, contracts, etc.).
- Switch to the Locations tab to associate physical locations with the company.
- Switch to the Documents tab to attach files.
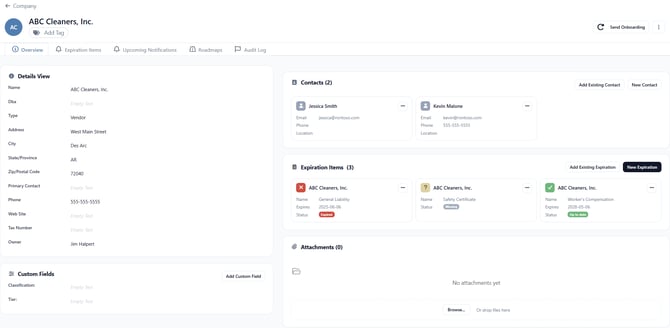
Step 5: Attach contacts to a company
- Open the company.
- Click the Contacts tab.
- Click Add Existing Contact to link a contact already in your account, or New Contact to create one.
The contact now appears on the company's page and the company appears on the contact's profile.
Step 6: Track company-wide expirations
The Expirations tab is where you track anything tied to the company itself (not to a specific employee). Common examples:
- Certificate of Insurance — annual.
- W-9 / W-8BEN — refreshed when expired.
- Master Service Agreement — renewal date.
- Vendor Compliance Forms — quarterly or annual.
Step 7: Merge or delete a company
From the company's detail page, click the three-dot actions menu in the upper right:
- Merge — combine the company with another. All contacts, expirations, and documents move into the destination company.
- Delete — permanently remove the company. Linked contacts are unlinked but not deleted.
Tips & Best Practices
- Use Company Types to organize. Setting up types like Vendor, Customer, and Subcontractor lets you filter and report on companies by their role.
- Set a Primary Contact. Many reports key on the Primary Contact field — leaving it blank limits report usefulness.
- Don't duplicate contacts. When adding a contact to a company, use Add Existing Contact if the person is already in your account — don't create a second contact record.
- Track insurance with company expirations. Don't add a vendor's COI as an expiration on a person — add it as an expiration on the vendor company. Cleaner reporting and fewer duplicates.
Troubleshooting
- Issue: A company appears multiple times in the list.
Solution: Open one of the duplicate records, click the actions menu, and choose Merge. Pick the destination company in the dialog to combine the records. - Issue: I don't see a Companies menu in the sidebar.
Solution: The Companies module may be hidden by an admin. Ask them to enable it, or check the Enabling and Disabling Apps & Modules article. - Issue: I can't add or edit companies — only view.
Solution: Your role doesn't include the company create/update permission. Ask an admin to update your role. - Issue: Bulk notifications to all contacts at a company aren't sending.
Solution: Check each contact has a valid email and that Send Notifications is enabled on their profile. Also verify the account-wide Send reminder emails and SMS toggle is on.