
This guide explains how to integrate QuickBooks Online with Expiration Reminder to sync customer data, financial records, and expiration details. Follow the steps below to connect your QuickBooks Online account to Expiration Reminder.
Things to know before you begin
-
Contacts in Expiration Reminder are matched with customers in QuickBooks based on their email address. Make sure that email addresses in both systems are up to date and that they match for the same users.
-
Contacts in Expiration Reminder are matched with employees in QuickBooks based on their names. Make sure that names in both systems are up to date and that they match for the same users.
-
You must have an existing QuickBooks Online account and be an Admin on that account to connect to QuickBooks Online.
Setting up the QuickBooks integration
1. Navigate to Integrations
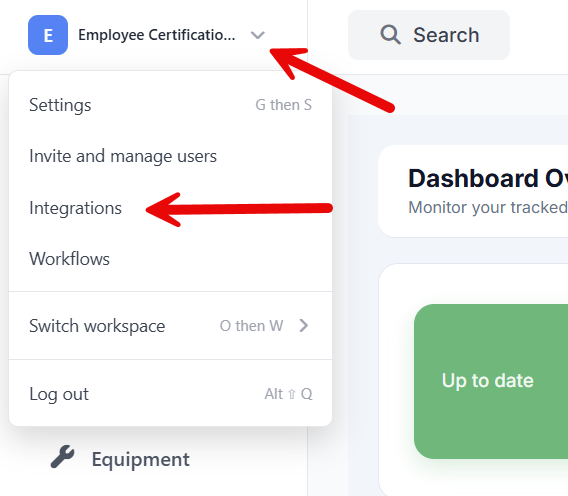
- Log in to your Expiration Reminder account.
- Click on your workspace name in the top-left corner.
- On the left-hand menu, click Integrations.
2. Select QuickBooks Online
- On the Integrations page, scroll down or use the search bar to find QuickBooks Online, then click on it.
3. Connect to QuickBooks
- Click the "Connect" button.
- A new window will open prompting you to sign in to your QuickBooks Online account.
- Enter your QuickBooks Online credentials and follow the login process.
4. Grant Permissions
- Once logged in, QuickBooks will ask for authorization to share data with Expiration Reminder.
- Review the permissions and click "Authorize" to proceed.

5. Configure Settings
- After authorization, you’ll be redirected back to Expiration Reminder.
- Configure your integration settings, including:
- Selecting which data to sync (e.g., invoices, customers, expiration-related details).
- Enabling automatic data updates.
- Mapping fields between Expiration Reminder and QuickBooks Online.
- Click "Save" to confirm your settings.
6. Verify the Connection
- Once connected, you’ll see a confirmation message.
- To verify, sync a sample record and confirm that the data appears correctly in both Expiration Reminder and QuickBooks Online.
Troubleshooting
If you encounter any issues while connecting QuickBooks Online to Expiration Reminder:
- Ensure you are using the correct QuickBooks Online credentials.
- Check that pop-ups are allowed in your browser for this site, as the QuickBooks authorization window may be blocked by your browser's pop-up blocker.
- Verify that your QuickBooks Online subscription plan includes API/third-party integrations (this feature is not available on all plans).
- If the connection fails, try disconnecting and reconnecting from the Integrations page.
- If issues persist, contact Expiration Reminder support for further assistance.